Pressure Canned Salmon Recipe Using a Salt Brine Method
Use a simple salt brine method to preserve this pressure canned salmon recipe. Safe, delicious, and ideal for long-term storage. Perfect for home canners!
Equipment
- Pressure Canner
- Canning Jars (half-pints)
- Canning Tools
- Large Bowl or Container
Ingredients
- Fresh Sockeye Salmon or Salmon Ends
For the Brine:
- 1 gallon Water 4 litres
- 1 cup Non-Iodized Salt canning or kosher salt
Instructions
Brine the Salmon
- Remove the skin (optional) and cut the salmon into smaller pieces. Wash fish pieces and place them in the brine, ensuring they are fully submerged. Let the salmon brine in the refrigerator for 1-2 hours. This step infuses the fish with flavor and improves its texture during canning.
Rinse and Dry
- After brining, remove the salmon from the brine and rinse it under cold water to remove excess salt. Pat the pieces dry with clean towels or paper towels.
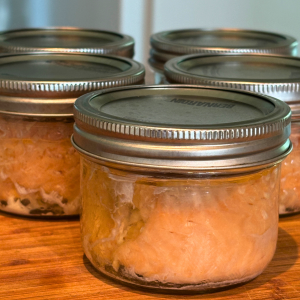
Pack the Jars
- Place the salmon chunks into sterilized jars and pack fish (half pints are my favorite), leaving 1-inch headspace at the top. Do not add liquid—the fish will release its juices during the canning process.
Seal the Jars
- Clean jar rims by wiping them with a cloth dipped in vinegar to remove any residue. This ensures a proper seal. Place the lid on the half-pint jar and tighten the metal bands to fingertip-tight.
Prepare the Pressure Canner
- Place the canning rack at the bottom of the canner. Add a few inches of water to the pressure canner and arrange the jars inside, ensuring they aren’t touching. Place the canner lid on the canner and lock the lid. Vent steam for 10 minutes before sealing the vent.
Process the Salmon
- Process half pint jars at 10-15 pounds of pressure (adjust for higher altitudes) for 100 minutes. Follow your pressure canner’s manual for specific instructions.
Cool and Check the Jars
- Once the processing is complete, allow the canner to cool naturally. Open it only when the pressure gauge reads zero or the pin drops; this will depend on your type of pressure canner. Carefully remove the jars and let them cool undisturbed for 12-24 hours. Test for good seals by pressing on the lids—if they don’t pop, the jars are sealed correctly. Wash jars and remove screw bands before moving to storage.
Notes
Special Tools (affiliate links): Pressure Canner | Bubble Remover | Jar Lifter |
Tried this recipe?Let us know how it was!
