How to Can Fresh Green and Yellow Beans at Home
Preserve the freshness of summer with this step-by-step guide to canning green and yellow beans. Using a pressure canner, you can safely store garden beans in jars that last all year long. Perfect for soups, casseroles, or a quick side dish, these home-canned beans bring a taste of the garden to your table—even in the middle of winter. With simple ingredients, tested methods, and tips for both hot and raw pack, this recipe ensures delicious, nutrient-rich beans on your pantry shelves. A must-have homesteading skill for anyone growing their own food!
Equipment
- Pressure Canner (a must for low-acid food like beans)
- Canning jars (pints or quarts) Two-piece canning lids
- Ladle and funnel
- Jar Lifter
- Bubble remover/headspace tool
Ingredients
- 8 –10 pounds of beans fresh green and/or yellow (yields about 7 quart jars or 14 pint jars)
- Non-iodized canning salt optional, for flavor
- Water
Instructions
Prepare the beans:
- Wash beans thoroughly in cold water, trim the ends, and cut or snap beans into 1-inch pieces.
Sterilize jars:
- Wash jars, lids, and bands in hot, soapy water. Keep the jars warm until they are ready to fill.
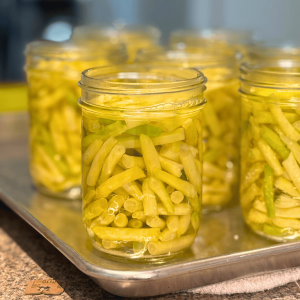
Hot pack method:
- Blanch fresh beans in boiling water for 5 minutes. Pack hot beans into hot jars, leaving 1 inch of headspace. Add ½ teaspoon of canning salt per pint or 1 tsp per quart if desired. Pour boiling water over beans, maintaining a 1-inch headspace. Using a bubble remover tool, remove the air bubbles. Wipe the rims with a clean, damp cloth, and secure the lids and screw bands finger-tight.
Raw pack or cold pack method:
- Pack the raw beans tightly into jars, leaving 1 inch of headspace. Add ½ teaspoon of salt per pint or 1 teaspoon per quart, if desired. Pour boiling water over the beans, maintaining a 1-inch head space. Using a bubble remover tool, remove the air bubbles. Wipe the rims with a clean, damp cloth, and secure the lids and screw bands finger-tight. Note: Beans may shrink more with this method.
Process in a pressure canner:
- Place jars in canner with 2–3 inches of water. Lock the canner lid and vent steam for 10 minutes before adding weight. Process pints for 20 minutes and quarts for 25 minutes at 10 pounds pressure (adjust for altitude).
Cool and store:
- At the end of the cooking time, turn off the heat, allow the pressure to return to zero, then carefully remove jars. Let cool undisturbed for 12–24 hours. Check for a good seal before labeling and storing
Notes
For the best quality, select fresh and young beans.
The jar size, whether using quart jars or pint jars, is personal preference depending on the serving size needed for your family.
Always refer to the detailed instruction manual of your pressure cooker/canner, and adjust the weight for your particular altitude.
Special Tools (affiliate links): | Pressure Canner |Jar Lifter |Funnel| Bubble Remover and Headspace Tool |
Tried this recipe?Let us know how it was!
