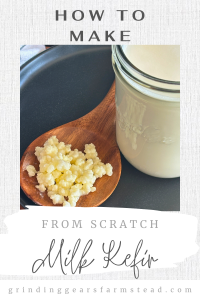
How to Make Milk Kefir
Enter the world of making homemade milk kefir. Kefir, often referred to as the “champagne of dairy,” is created through the fermentation of kefir grains in milk. This fermented dairy product is rich in probiotics and is known for its benefits to gut health and overall well-being. Here, you will discover how simple and fun it is to make milk kefir right in your kitchen.
Not only does homemade kefir offer a delightful tangy flavor, but it also holds the key to a plethora of health advantages. This ancient elixir is a powerhouse of nutrients, from aiding digestion to boosting immunity.
Let’s jump into making this tasty and healthy treat.
Jump to RecipeThis post contains affiliate links. I earn from purchases at no extra cost to you. See my full disclosure here.
Understanding Milk Kefir
Milk kefir, a tangy fermented beverage, is known for being probiotic-rich, having numerous health benefits, and having a unique taste. The key component to the fermentation process is adding kefir grains to fresh milk.
Health Benefits of Kefir
Kefir is known for its health-promoting properties, offering a variety of benefits for overall well-being. Studies have shown that consuming milk kefir can improve gut health, enhance immunity, and increase nutrient absorption. Furthermore, kefir is a potent probiotic that supports digestion and may help alleviate digestive issues.
Research has highlighted the importance of kefir in maintaining strong bones, managing inflammation, and promoting a healthy balance of gut bacteria. The probiotics in kefir contribute to a robust microbiome, essential for optimal digestion and overall health. Additionally, kefir is a good source of calcium, protein, and B vitamins, making it a nutrient-dense addition to your diet.
For more in-depth information on the health benefits of kefir, you can refer to articles such as What Are Kefir and Its Health Benefits? and 6 Health Benefits Of Kefir, According To Nutrition Experts.
How to Make Homemade Milk Kefir
Making milk kefir at home is a rewarding and straightforward process that requires some essential ingredients and equipment. Understanding the fermentation timeline and temperature considerations is also important. Here are the basics of how to make homemade milk kefir.
Ingredients and Equipment
To begin your milk kefir adventure, you will need a few key ingredients and tools. Here’s what you’ll need to gather:
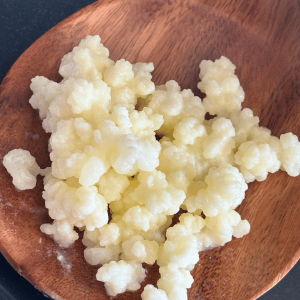
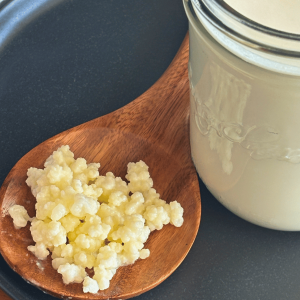
- Kefir grains: These tiny, gelatinous beads contain a symbiotic culture of bacteria and yeast (SCOBY) essential for fermenting milk into kefir. Need to start from scratch and need kefir grains, I’ve had great success with these.
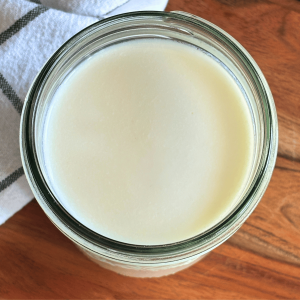
- Fresh milk: Opt for high-quality whole milk for the best results, avoiding ultra-pasteurized varieties.
- Non-metal utensils: When handling kefir grains and during fermentation, it’s crucial to use non-metallic utensils to prevent any adverse reactions with the grains.
- Glass jars: Choose glass containers for fermenting your milk kefir, as they are non-reactive and ideal for maintaining a healthy fermentation environment.
- Cover for the Jar: A lid for the jar or a coffee filter with a rubber band. You will need something to prevent dust and bugs from getting into the jar.
Fermentation Process
Once you have gathered your ingredients and equipment, it’s time to kickstart the fermentation process. Here’s a breakdown of what to expect:
- Fermentation timeline: The fermentation period for milk kefir typically ranges from 12 to 24 hours, depending on factors like temperature and the desired level of fermentation.
- Temperature considerations: Maintaining a consistent temperature between 65°F to 85°F (18°C to 29°C) is crucial for the optimal fermentation of milk kefir. Fluctuations in temperature can affect the fermentation process. During the summer months, when temperatures are higher, the milk kefir will ferment more quickly, and it may take longer during the winter months if the house is cooler. It is important to note the kitchen’s temperature and adjust the fermentation time accordingly.
- Role of kefir grains: Kefir grains play a vital role in transforming milk into kefir by interacting with the lactose and beneficial bacteria present in the milk. The grains feed on the lactose (milk sugar) in the milk. These grains need to be handled with care and provided with a suitable environment for growth.
- Patience and hygiene: Patience is vital when making milk kefir, as fermentation takes time to reach the desired consistency and flavor. Additionally, you must ensure proper hygiene practices during preparation to prevent contamination.
Soon, you will enjoy your delicious and nutritious homemade milk kefir creations.

Caring for Your Kefir Grains
Proper storage and maintenance play a crucial role in ensuring the health and longevity of your kefir grains. Storing kefir grains correctly between batches is essential to keeping them thriving and active. Understanding the best practices for storing and refreshing your kefir grains will help you maintain a continuous supply of delicious homemade kefir.
Storage
The ideal method for storing kefir grains between batches is to place them in a jar of milk or in the refrigerator. Keeping the grains in the fridge helps slow down the fermentation process, allowing them to remain dormant but viable for an extended period. Cold temperatures are also beneficial for maintaining the grains when not in use.
Maintenance
Periodically refreshing your kefir grains is necessary to ensure their vitality. To revive dormant grains, strain them from their storage liquid, rinse them gently with fresh milk, and allow them to ferment at room temperature for a few cycles. Feeding the grains with fresh milk refreshes them and restores their activity, preparing them for the next batch of kefir.
By following these storage and maintenance practices, you can preserve the health of your kefir grains and enjoy a continuous supply of probiotic-rich kefir. Proper care and periodic refreshing will sustain the grains’ longevity, allowing you to easily create delicious and nutritious homemade kefir.
Taking a Break
If you need to take a longer break from making milk kefir, you can put the grains with some fresh milk into a small freezer bag and freeze them until you want to start making kefir again. To re-activate the frozen kefir grains, remove them from the freezer and let them thaw. Once thawed, put in a clean glass jar with fresh milk. Continue the same schedule as you do for making kefir. It may take a few feedings before the grains are active.
Milk to Kefir Grains Ratio
One to two tablespoons will ferment one quart of milk. Happy kefir grains will reproduce, and you may have more than you need. Once this happens, you can share it with friends and family so they can make their own homemade milk kefir.
Best Location to Ferment in the Kitchen
Place covered milk kefir in a warm place where they will not be disturbed. I like to place mine on top of the fridge. If you have other ferments in the kitchen, ensure that six feet are between each. This distance is adequate to prevent cross-contamination.
Troubleshooting Common Kefir Issues
To ensure a successful fermentation journey, beginners may encounter some common problems when making milk kefir at home.
Solving Over-Fermentation
Over-fermentation can lead to overly sour or separated kefir, affecting taste and texture. To recognize over-fermented kefir, look out for a sharp, vinegary smell and a separation of the whey from the curds. If you identify over-fermentation, there are creative ways to salvage your batch. You can use over-fermented kefir in recipes like smoothies, pancakes, or salad dressings, where its tangy flavor can enhance the dish.
Preventing Separation and Off-Flavors
Ensure proper temperature control during fermentation to prevent separation and off-flavors in your Kefir. Fluctuations in temperature can impact the consistency and taste of Kefir. Maintain a consistent environment for fermentation to avoid these issues. Additionally, adhere to recommended fermentation times to achieve the desired flavor profile.
Common Questions:
What is the best type of milk to use?
Kefir works best with whole milk.
Can you use store-bought milk to make Kefir?
Yes, you can. Look for whole milk. Pasteurized and homogenized milk and raw milk work well.
How many times can you reuse kefir grains?
When the grains are well cared for, they can be used indefinitely.
How to make Kefir thick and creamy?
Use whole milk. You need a high-fat content to create a thick and creamy texture. Ensure that it is not over-fermented. I like to place the jar of fermented Kefir in the fridge for a few hours before separating the grains. This produces a thicker end product.

Kefir Recipe Ideas
Okay, now you have a never-ending supply of Kefir; what can you do with it? With its tangy and creamy texture, Kefir can be a versatile ingredient in a myriad of recipes, adding a nutritious twist to your meals. Whether you prefer sweet or savory flavors, there are endless possibilities to experiment with this probiotic-rich gem. Here are some simple ideas to get you started:
- Make Kefir smoothies.
- Use in homemade salad dressings.
- Use to make potato salad.
- Use in your favorite overnight oats recipe.
- Make Kefir ice cream or Kefir popsicles.
- Use in your homemade bread and buns recipe.
- Make a homemade version of “Yop,” the favored drinkable yogurt.
- Kefir cheese.
Pin for Later
By following these tips, you can consistently enjoy delicious milk kefir batches.
If you start making your own kefir and love it, please tag me on Instagram @grindinggearsfarmstead.
Happy cooking, happy sharing, and may your kitchen always be filled with laughter and love.
![]()
How to Make Milk Kefir
Equipment
- Clean quart jar
- Lid or coffee filter with rubber band
Ingredients
- 1 - 2 TBSP Kefir Grains
- 1 Quart Milk (4 cups)
Instructions
- Add milk to a clean quart jar.
- Add 1-2 TBSP of active milk Kefir grains.
- Loosely put on a canning lid or cover with coffee filter and rubber band.
- Place jar in a warm place in the kitchen where it will not be disturbed.
- Leave to ferment for 12 to 36 hours, until the desired thickness and taste is achieved.
- Put in the fridge for 4 hours or overnight. (This step produces a thicker end product.)
- Using a mesh strainer, strain out the grains from the kefir. You will need to use a non-metallic utensil to work the kefir through the strainer.
- Make a fresh batch of Kefir by placing the grains in a jar of fresh milk and complete the cycle again.
- Use the kefir in your favorite recipe or enjoy as a delicious drink.