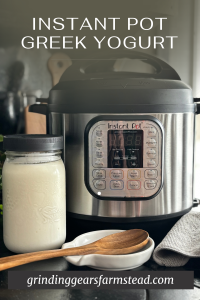
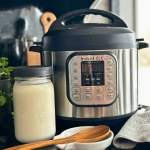
Instant Pot Greek Yogurt
Making your own Greek yogurt has never been so simple with the use of an Instant Pot.
Jump to Recipe
Greek yogurt has soared in popularity, celebrated for its rich texture and health benefits. You will be surprised how easy it is to turn simple ingredients into a nutrient-packed staple with the aid of your trusty Instant Pot. Creating this probiotic-packed food at home is about convenience and taking charge of what goes into your food.
Homemade Greek yogurt boasts live cultures that aid digestion and boost immunity, a far cry from store-bought alternatives laden with additives. This homemade blend of protein, calcium, and probiotics elevates your snacking game and nurtures your body from the inside out.
This post may contains affiliate links. I earn from purchases at no extra cost to you. See my full disclosure here.
Benefits of Greek Yogurt
Nutritional Value
Greek yogurt offers nutritional advantages over regular yogurt, including higher protein content and lower sugar levels. Greek yogurt is a nutritional powerhouse packed with essential nutrients that can benefit your overall health. It is rich in calcium, potassium, and essential vitamins. Calcium is crucial for bone health, potassium helps regulate blood pressure, and vitamins contribute to various bodily functions. Incorporating homemade Greek yogurt into your diet gives your body the necessary nutrients to support a healthy lifestyle.
Probiotic Power
One of the standout features of homemade Greek yogurt is its probiotic content. Probiotics play a vital role in promoting gut health and boosting immune function. Unlike commercial varieties that may lack live active cultures, homemade Greek yogurt contains these beneficial bacteria that support digestion and overall well-being. Regularly consuming homemade Greek yogurt can enhance your gut microbiome and strengthen your immune system naturally.
Benefits of Making Your Own Instant Pot Greek Yogurt
Cost-Effective and Budget-Friendly Option
When you choose to make your yogurt using an Instant Pot, you create a delicious snack and a wallet-friendly option. With milk and yogurt prices being what they are, the cost-effectiveness of this endeavor becomes evident. When regularly making homemade yogurt, you will use some of the last batch to culture the next batch, eliminating the need to purchase a starter. This makes it even more cost-effective.
Control Over Ingredients and Flavour
One of the most enticing aspects of making yogurt with an Instant Pot is the amount of control and customization it offers. You can select high-quality milk, ensuring your yogurt is made from top-notch ingredients. Moreover, infusing your creation with various flavors and sweeteners allows you to tailor your yogurt exactly to your taste preferences.
Probiotic Richness for Gut Health
Homemade yogurt is a powerhouse of probiotics, which are beneficial microorganisms crucial for gut health. By fermenting your yogurt using an Instant Pot, you ensure that your gut receives a rich dose of these probiotics, improving digestion and overall well-being.
Nutritional Value and Reduced Additives
Creating yogurt at home with an Instant Pot guarantees a heightened nutritional value compared to store-bought alternatives. By controlling the ingredients and manufacturing process, you can minimize the presence of additives, preservatives, and artificial sugars, ensuring that your yogurt remains a wholesome and nourishing delight. Making your own homemade yogurt assures you of consuming a nutritious and additive-free treat.
Environmental Benefits and Sustainability
Beyond personal health advantages, making yogurt with an Instant Pot aligns with sustainability practices. By opting for homemade yogurt, you play a part in reducing single-use packaging from store-bought options and minimize your environmental footprint. This eco-conscious choice benefits your well-being and contributes to a greener and more sustainable lifestyle.
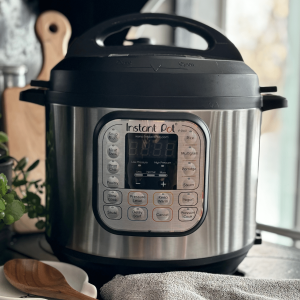
How an Instant Pot Simplifies the Greek Yogurt-Making Process
Making yogurt at home using an Instant Pot offers several advantages that simplify the entire process, making it an efficient and rewarding experience. I have a 6-quart and an 8-quart; the 6-quart Instant Pot is my favorite.
Consistent Temperature Control
One significant benefit of using an Instant Pot for yogurt is its ability to maintain a consistent temperature throughout fermentation. The precise temperature control feature ensures that the yogurt cultures thrive and multiply optimally, resulting in a creamy and flavorful end product.
Time Efficiency and Convenience
The Instant Pot streamlines the yogurt-making process by reducing the overall time required. With the “Yogurt” function setting, you can easily set the desired incubation time and let the Instant Pot handle the rest. This time-saving aspect is particularly beneficial for busy individuals who want to enjoy fresh yogurt without spending hours in the kitchen.
Ease of Use and Reduced Monitoring
By leveraging the consistent temperature control, time efficiency, and ease of use offered by an Instant Pot, making Greek yogurt at home becomes a straightforward and rewarding experience. The Instant Pot simplifies the process, allowing you to enjoy delicious and nutritious homemade yogurt with minimal effort.
Steps to Make Yogurt Using an Instant Pot
Let’s walk through the simple steps to create your delicious yogurt:
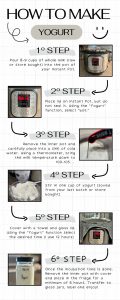
Prepare the Milk
Begin by pouring milk into the Instant Pot. I prefer to use raw milk, but have had success with store bought whole milk or 2% milk. The “Yogurt” feature on the Instant Pot makes this process very easy. Press the “Yogurt” button until you see “BOIL” on the display. This process heats the milk until it reaches about 180°F (82°C), which helps sterilize and change the protein structure of the milk. The Instant Pot will beep once this cycle is done.
Inoculate the Milk with Yogurt Culture
Now, it is time to cool the milk. You can wait for the milk to cool on its own, but I like to carefully remove the inner pot and set it in a sink of cold water; this speeds the process up. While stirring, use a thermometer to monitor the temperature of the milk; you want to cool it to 100°F-108°F. Once the milk has reached the desired temperature, it’s time to add your yogurt culture. You can use store-bought yogurt with live active cultures or a starter culture. Add the yogurt culture to the warmed milk and stir well.
Incubate in the Instant Pot
After adding the culture, cover the Instant Pot with a towel and a lid. I like to add the towel so the condensation doesn’t fall into the culturing yogurt. Set the Instant Pot to the “Yogurt” setting for 8 to 12 hours. The longer it incubates, the tangier the yogurt will be. The live cultures will work their magic, fermenting the milk and turning it into a creamy yogurt.
Chill and Strain (if Desired)
Once the incubation period is complete, remove the pot from the Instant Pot and place it in the refrigerator to chill for at least a few hours. I generally leave it cool in the fridge overnight. If you prefer a thicker Greek-style yogurt, you can strain the yogurt using a cheesecloth or a yogurt strainer to remove excess whey.
Storing and Serving Homemade Yogurt
After making your delicious homemade yogurt, storing it properly to maintain its freshness and flavor is essential. Choosing the proper storage containers and exploring creative ways to serve your homemade yogurt can enhance your overall yogurt experience.
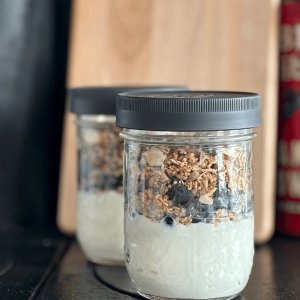
Proper Storage Containers
Selecting the correct storage container can make a significant difference in preserving the quality of your homemade yogurt. Glass jars with airtight lids or plastic containers designed for food storage are ideal choices. My container of choice is mason jars with Ball lids. Ensure the containers are clean and dry before transferring the yogurt. Avoid exposing the yogurt to strong odors by using an airtight seal to protect its taste.
When storing homemade yogurt in the fridge, maintain a consistent temperature to prevent the yogurt from souring too quickly. Homemade yogurt can typically last for at least two weeks in the refrigerator. If you plan to use your homemade yogurt as a starter for another batch, store it properly to maintain its active cultures.
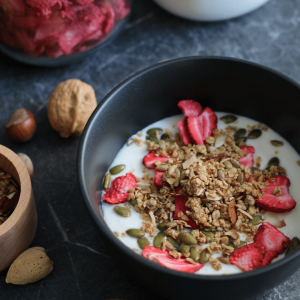
 Serving Ideas
 Serving Ideas
Okay, so now you have a bunch of homemade yogurt! Here are some ideas on how to use it:
- It is excellent all on its own, but try adding nuts, honey, granola, or fruit (fresh, frozen, or freeze-dried).
- Use it as a marinade; it is a natural meat tenderizer.
- Add it to salad dressings. Creamy Greek, Creamy Cucumber, and Creamy Ceasar are some of our favorites.
- Use it to replace mayo; you still get mayo’s tangy flavor and creaminess.
- Use it as a substitute for sour cream when making your favorite dip.
- Make this Tzatziki recipe.
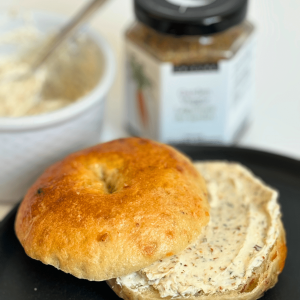
- Make yogurt cheese: this is a soft cheese made by simply straining the yogurt to remove the whey until it reaches a desired consistency. Great on bagels!
- Flavor it and freeze it for a homemade frozen yogurt.
- Add it to your favorite smoothie.
- To create parfaits, lay Greek yogurt, granola, and fruit in mason jars or decorative bowls. Make these ahead of time for a quick snack or addition to a lunch kit.
Troubleshooting Common Issues
So you’ve embarked on the journey of making your own Instant Pot yogurt, but sometimes things don’t go as planned. Don’t worry; troubleshooting common issues can help you achieve that perfect batch of creamy homemade yogurt. Let’s look at some common problems and how you can solve them:
Yogurt Not Setting Properly
The temperature might be the culprit if your yogurt is not setting correctly. Ensure that your Instant Pot maintains a consistent temperature during the incubation period, between 108°F and 110°F. You can check the temperature using a reliable thermometer to guarantee it’s within the optimal range for culturing yogurt.
Yogurt Too Thin or Runny
When your yogurt turns out too thin or runny, it could be due to excess whey. To thicken it up, you can strain the yogurt using a cheesecloth, a fine-mesh strainer, or a yogurt strainer. Allow the yogurt to strain for a few hours in the refrigerator until you achieve the desired thickness.
Yogurt Too Tart or Sour
If your yogurt ends up too tart or sour for your liking, you might have over-incubated it. Next time, try reducing the incubation time slightly to achieve a milder flavor. Remember, tasting your yogurt throughout the process can help you determine the perfect balance of tartness.
Troubleshooting these common issues can elevate your homemade yogurt-making experience, ensuring a delicious and creamy result that rivals store-bought options. Don’t get discouraged by setbacks; with some adjustment and practice, you’ll soon master the art of making the perfect Instant Pot yogurt.
Pin for Later
Special Tools (affiliate links): Instant Pot | Epicure Lemon Dilly | Ball Lids | Thermometer | Yogurt Strainer |
Instant Pot yogurt is a satisfying and cost-effective way to enjoy creamy, homemade yogurt. By following these simple steps, you can create delicious yogurt with the added benefit of controlling the ingredients and flavors to suit your preferences.
Here is a printable How to Make Yogurt in an Instant Pot in a step-by-step format.
If you try this recipe and love it, please tag me on Instagram @grindinggearsfarmstead.
Happy cooking, happy sharing, and may your kitchen always be filled with laughter and love.
![]()
Instant Pot Greek Yogurt
Equipment
- Instant Pot Pressure Cooker
- Thermometer
- Glass jars with airtight lids
- Metal spoon or whisk
Materials
- 8 cups Milk
- 1 cup Greek yogurt (store bought) (must have an active starter)
Instructions
- Pour 8 cups of milk into the Instant Pot.
- Put on the lid. NO need to turn the Steam Release Valve to seal.
- Using the "Yogurt" feature on the Instant Pot, select "BOIL"
- The Instant Pot will beep once it is done the "BOIL" cycle. Carefully remove the lid, it will be steamy.
- Remove the inner pot and set in a sink of cold water.
- Stir and monitor the temperature of the milk with a thermometer, until it reaches 100°F-108°F.
- Dry off the outside of the inner pot and put back into the Instant Pot.
- Add 1 cup of yogurt. Using a whisk or spoon, mix to incorporate thoroughly.
- Cover pot with towel and glass lid. (can be any lid that fits)
- Using the "Yogurt" feature on the Instant Pot select desired time for incubation. Normal times are 8 to 12 hours.
- Once the incubation time has lapsed. Removed the inner pot with lid to the fridge. I like to leave it in the fridge overnight.
- If you want a thicker Greek style yogurt, spoon the yogurt into a strainer to remove some of the whey.
- Once the yogurt is the desired consistency, transfer it into glass containers. Make sure you label the jars.
Notes